Validating OpenVPN's low-latency servers patch
This lab tests a neat OpenVPN patch: lowest-latency-server. When multiple remote servers are configured, the client measures their latency and connects preferentially to the lowest-latency one.
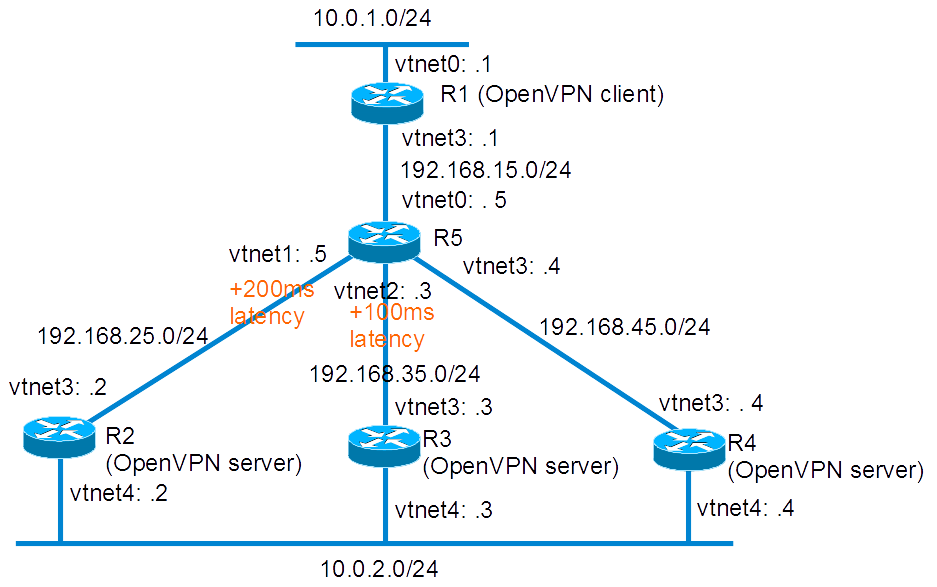
Overview
Network diagram
Lab built following How to build a BSDRP router lab: 5 routers with full-meshed links.
Here is the logical and physical view:
Base router configuration
Start a 5-router full-mesh lab with one shared LAN:
root@lab:~ # /tools/BSDRP-lab-bhyve.sh -i BSDRP-1.591-full-amd64-vga.img.xz -n 5 -l 1
BSD Router Project (http://bsdrp.net) - bhyve full-meshed lab script
Setting-up a virtual lab with 5 VM(s):
- Working directory: /root/BSDRP-VMs
- Each VM has a total of 1 (1 cores and 1 threads) and 512M RAM
- Emulated NIC: virtio-net
- Switch mode: bridge + tap
- 1 LAN(s) between all VM
- Full mesh Ethernet links between each VM
VM 1 have the following NIC:
- vtnet0 connected to VM 2.
- vtnet1 connected to VM 3.
- vtnet2 connected to VM 4.
- vtnet3 connected to VM 5.
- vtnet4 connected to LAN number 1
VM 2 have the following NIC:
- vtnet0 connected to VM 1.
- vtnet1 connected to VM 3.
- vtnet2 connected to VM 4.
- vtnet3 connected to VM 5.
- vtnet4 connected to LAN number 1
VM 3 have the following NIC:
- vtnet0 connected to VM 1.
- vtnet1 connected to VM 2.
- vtnet2 connected to VM 4.
- vtnet3 connected to VM 5.
- vtnet4 connected to LAN number 1
VM 4 have the following NIC:
- vtnet0 connected to VM 1.
- vtnet1 connected to VM 2.
- vtnet2 connected to VM 3.
- vtnet3 connected to VM 5.
- vtnet4 connected to LAN number 1
VM 5 have the following NIC:
- vtnet0 connected to VM 1.
- vtnet1 connected to VM 2.
- vtnet2 connected to VM 3.
- vtnet3 connected to VM 4.
- vtnet4 connected to LAN number 1
For connecting to VM'serial console, you can use:
- VM 1 : cu -l /dev/nmdm1B
- VM 2 : cu -l /dev/nmdm2B
- VM 3 : cu -l /dev/nmdm3B
- VM 4 : cu -l /dev/nmdm4B
- VM 5 : cu -l /dev/nmdm5B
Router 1
sysrc hostname=R1 \
  ifconfig_vtnet0="inet 10.0.1.1/24" \
  ifconfig_vnet0_ipv6="inet6 2001:db8:1::1 prefixlen 64" \
  ifconfig_vtnet3="inet 192.168.15.1/24" \
  ifconfig_vtnet3_ipv6="inet6 2001:db8:15::1 prefixlen 64" \
  defaultrouter=192.168.15.5 \
  ipv6_defaultrouter=2001:db8:15::5
service hostname restart
service netif restart
service routing restart
config save
Router 2
sysrc hostname=R2 \
  ifconfig_vtnet4="inet 10.0.2.2/24" \
  ifconfig_vtnet4_ipv6="inet6 2001:db8:2::2 prefixlen 64" \
  ifconfig_vtnet3="inet 192.168.25.2/24" \
  ifconfig_vtnet3_ipv6="inet6 2001:db8:25::2 prefixlen 64" \
  defaultrouter="192.168.25.5" \
  ipv6_defaultrouter="2001:db8:25::5"
service hostname restart
service netif restart
service routing restart
config save
Router 3
sysrc hostname=R3 \
  ifconfig_vtnet4="inet 10.0.2.3/24" \
  ifconfig_vtnet4_ipv6="inet6 2001:db8:2::3 prefixlen 64" \
  ifconfig_vtnet3="inet 192.168.35.3/24" \
  ifconfig_vtnet3_ipv6="inet6 2001:db8:35::3 prefixlen 64" \
  defaultrouter="192.168.35.5" \
  ipv6_defaultrouter="2001:db8:35::5"
service hostname restart
service netif restart
service routing restart
config save
Router 4
Router 4 base configuration, like R2: a simple connected-network router with a default route pointing to R5.
sysrc hostname=R4 \
  ifconfig_vtnet4="inet 10.0.2.4/24" \
  ifconfig_vtnet4_ipv6="inet6 2001:db8:2::4 prefixlen 64" \
  ifconfig_vtnet3="inet 192.168.45.4/24" \
  ifconfig_vtnet3_ipv6="inet6 2001:db8:45::4 prefixlen 64" \
  defaultrouter="192.168.45.5" \
  ipv6_defaultrouter="2001:db8:45::5"
service hostname restart
service netif restart
service routing restart
config save
Router 5
Router 5 is the central router simulating the Internet and low-latency links.
sysrc hostname=R5 \
  ifconfig_vtnet0="inet 192.168.15.5/24" \
  ifconfig_vtnet1="inet 192.168.25.5/24" \
  ifconfig_vtnet2="inet 192.168.35.5/24" \
  ifconfig_vtnet3="inet 192.168.45.5/24" \
  ifconfig_vtnet0_ipv6="inet6 2001:db8:15::5 prefixlen 64" \
  ifconfig_vtnet1_ipv6="inet6 2001:db8:25::5 prefixlen 64" \
  ifconfig_vtnet2_ipv6="inet6 2001:db8:35::5 prefixlen 64" \
  ifconfig_vtnet3_ipv6="inet6 2001:db8:45::5 prefixlen 64" \
  firewall_enable=YES \
  firewall_script="/etc/ipfw.rules"
cat > /etc/ipfw.rules <<EOF
#!/bin/sh
fwcmd="/sbin/ipfw"
kldstat -q -m dummynet || kldload dummynet
# Flush out the list before we begin.
\${fwcmd} -f flush
#Create pipes (one for each direction)
\${fwcmd} pipe 52 config delay 100ms
\${fwcmd} pipe 25 config delay 100ms
\${fwcmd} pipe 53 config delay 50ms
\${fwcmd} pipe 35 config delay 50ms
\${fwcmd} add pipe 25 all from any to any in via vtnet1
\${fwcmd} add pipe 52 all from any to any out via vtnet1
\${fwcmd} add pipe 35 all from any to any in via vtnet2
\${fwcmd} add pipe 53 all from any to any out via vtnet2
#We don't want to block traffic, only shape some
\${fwcmd} add allow ip from any to any
EOF
service hostname restart
service netif restart
service routing restart
service ipfw start
config save
OpenVPN
CA and certificates generation
All these steps are done on R2 (the OpenVPN server and CA).
Start by copying the easyrsa3 configuration folder and defining the new configuration variables:
cp -r /usr/local/share/easy-rsa /usr/local/etc/
setenv EASYRSA /usr/local/etc/easy-rsa
Initialize PKI and generate a DH:
cd /usr/local/etc/easy-rsa
easyrsa init-pki
easyrsa gen-dh
Build a root certificate:
[root@R2]~# easyrsa build-ca nopass

Note: using Easy-RSA configuration from: /usr/local/etc/easy-rsa/vars
Generating a 2048 bit RSA private key
...............................................+++
..................................................................................+++
writing new private key to '/usr/local/etc/easy-rsa/pki/private/ca.key.EvwYAl9tEs'
-----
You are about to be asked to enter information that will be incorporated
into your certificate request.
What you are about to enter is what is called a Distinguished Name or a DN.
There are quite a few fields but you can leave some blank
For some fields there will be a default value,
If you enter '.', the field will be left blank.
-----
Common Name (eg: your user, host, or server name) [Easy-RSA CA]:

CA creation complete and you may now import and sign cert requests.
Your new CA certificate file for publishing is at:
/usr/local/etc/easy-rsa/pki/ca.crt
Make server certificates called R2, R3, and R4, then a client certificate called R1:
easyrsa build-server-full R2 nopass
easyrsa build-server-full R3 nopass
easyrsa build-server-full R4 nopass
easyrsa build-client-full R1 nopass
config save
R2: First OpenVPN server and cert generator
Create the openvpn configuration file for server mode as /usr/local/etc/openvpn/openvpn.conf:
mkdir /usr/local/etc/openvpn
cat > /usr/local/etc/openvpn/openvpn.conf <<'EOF'
dev tun
tun-ipv6
ca /usr/local/etc/easy-rsa/pki/ca.crt
cert /usr/local/etc/easy-rsa/pki/issued/R2.crt
key /usr/local/etc/easy-rsa/pki/private/R2.key
dh /usr/local/etc/easy-rsa/pki/dh.pem
server 10.0.21.0 255.255.255.0
server-ipv6 2001:db8:21::/64
keepalive 5 60
ifconfig-pool-persist ipp.txt
client-config-dir ccd
push "route 10.0.2.0 255.255.255.0"
push "route-ipv6 2001:db8:2::/64"
route 10.0.1.0 255.255.255.0
route-ipv6 2001:db8:1::/64
'EOF'
Create the client-configuration directory and declare the volatile route to the subnet behind the client R1:
mkdir /usr/local/etc/openvpn/ccd
cat > /usr/local/etc/openvpn/ccd/R1 <<'EOF'
iroute 10.0.1.0 255.255.255.0
iroute-ipv6 2001:db8:1::/64
'EOF'
Enable and start openvpn and sshd (we will fetch the certificate files via SCP later):
service openvpn enable
service openvpn start
service sshd enable
service sshd start
And set a password for the root account (mandatory for the next SCP file copy):
passwd
R3: Second OpenVPN server
Create the openvpn configuration file for server mode as /usr/local/etc/openvpn/openvpn.conf:
mkdir /usr/local/etc/openvpn
cat > /usr/local/etc/openvpn/openvpn.conf <<'EOF'
dev tun
tun-ipv6
ca ca.crt
cert R3.crt
key R3.key
dh dh.pem
server 10.0.31.0 255.255.255.0
server-ipv6 2001:db8:31::/64
keepalive 5 60
ifconfig-pool-persist ipp.txt
client-config-dir ccd
push "route 10.0.2.0 255.255.255.0"
push "route-ipv6 2001:db8:2::/64"
route 10.0.1.0 255.255.255.0
route-ipv6 2001:db8:1::/64
'EOF'
Create the client-configuration directory and declare the volatile route to the subnet behind the client R1:
mkdir /usr/local/etc/openvpn/ccd
cat > /usr/local/etc/openvpn/ccd/R1 <<'EOF'
iroute 10.0.1.0 255.255.255.0
iroute-ipv6 2001:db8:1::/64
'EOF'
Then fetch the CA and the host's own certificate from R2:
scp 192.168.25.2:/usr/local/etc/easy-rsa/pki/ca.crt /usr/local/etc/openvpn
scp 192.168.25.2:/usr/local/etc/easy-rsa/pki/dh.pem /usr/local/etc/openvpn
scp 192.168.25.2:/usr/local/etc/easy-rsa/pki/issued/R3.crt /usr/local/etc/openvpn
scp 192.168.25.2:/usr/local/etc/easy-rsa/pki/private/R3.key /usr/local/etc/openvpn
Enable and start openvpn:
service openvpn enable
service openvpn start
R4: Third OpenVPN server
Create the openvpn configuration file for server mode as /usr/local/etc/openvpn/openvpn.conf:
mkdir /usr/local/etc/openvpn
cat > /usr/local/etc/openvpn/openvpn.conf <<'EOF'
dev tun
tun-ipv6
ca ca.crt
cert R4.crt
key R4.key
dh dh.pem
server 10.0.41.0 255.255.255.0
server-ipv6 2001:db8:41::/64
keepalive 5 60
ifconfig-pool-persist ipp.txt
client-config-dir ccd
push "route 10.0.2.0 255.255.255.0"
push "route-ipv6 2001:db8:2::/64"
route 10.0.1.0 255.255.255.0
route-ipv6 2001:db8:1::/64
'EOF'
Create the client-configuration directory and declare the volatile route to the subnet behind the client R1:
mkdir /usr/local/etc/openvpn/ccd
cat > /usr/local/etc/openvpn/ccd/R1 <<'EOF'
iroute 10.0.1.0 255.255.255.0
iroute-ipv6 2001:db8:1::/64
'EOF'
Then fetch the CA and the host's own certificate from R2:
scp 192.168.25.2:/usr/local/etc/easy-rsa/pki/ca.crt /usr/local/etc/openvpn
scp 192.168.25.2:/usr/local/etc/easy-rsa/pki/dh.pem /usr/local/etc/openvpn
scp 192.168.25.2:/usr/local/etc/easy-rsa/pki/issued/R4.crt /usr/local/etc/openvpn
scp 192.168.25.2:/usr/local/etc/easy-rsa/pki/private/R4.key /usr/local/etc/openvpn
Enable and start openvpn:
service openvpn enable
service openvpn start
R1: OpenVPN client
As the OpenVPN client, R1 needs to fetch these files from R2 and place them in /usr/local/etc/openvpn:
- ca.crt
- R1.crt
- R1.key
In this lab, scp can be used to fetch the files:
mkdir /usr/local/etc/openvpn
scp 192.168.25.2:/usr/local/etc/easy-rsa/pki/ca.crt /usr/local/etc/openvpn
scp 192.168.25.2:/usr/local/etc/easy-rsa/pki/issued/R1.crt /usr/local/etc/openvpn
scp 192.168.25.2:/usr/local/etc/easy-rsa/pki/private/R1.key /usr/local/etc/openvpn
Configure openvpn as a client:
cat > /usr/local/etc/openvpn/openvpn.conf <<'EOF'
client
dev tun
#Declare servers with bigger latency first
remote 192.168.25.2
remote 192.168.35.3
remote 192.168.45.4
remote-cert-tls server
ca ca.crt
cert R1.crt
key R1.key
'EOF'
Check the latency of each server (200 ms, 100 ms, and less than 1 ms):
[root@R1]~# ping -c 2 192.168.25.2
PING 192.168.25.2 (192.168.25.2): 56 data bytes
64 bytes from 192.168.25.2: icmp_seq=0 ttl=63 time=192.628 ms
64 bytes from 192.168.25.2: icmp_seq=1 ttl=63 time=200.045 ms

--- 192.168.25.2 ping statistics ---
2 packets transmitted, 2 packets received, 0.0% packet loss
round-trip min/avg/max/stddev = 192.628/196.336/200.045/3.708 ms

[root@R1]~# ping -c 2 192.168.35.3
PING 192.168.35.3 (192.168.35.3): 56 data bytes
64 bytes from 192.168.35.3: icmp_seq=0 ttl=63 time=96.894 ms
64 bytes from 192.168.35.3: icmp_seq=1 ttl=63 time=100.052 ms

--- 192.168.35.3 ping statistics ---
2 packets transmitted, 2 packets received, 0.0% packet loss
round-trip min/avg/max/stddev = 96.894/98.473/100.052/1.579 ms

[root@R1]~# ping -c 2 192.168.45.4
PING 192.168.45.4 (192.168.45.4): 56 data bytes
64 bytes from 192.168.45.4: icmp_seq=0 ttl=63 time=0.241 ms
64 bytes from 192.168.45.4: icmp_seq=1 ttl=63 time=0.257 ms

--- 192.168.45.4 ping statistics ---
2 packets transmitted, 2 packets received, 0.0% packet loss
round-trip min/avg/max/stddev = 0.241/0.249/0.257/0.008 ms
Enable and start openvpn:
service openvpn enable
service openvpn start
Testing
Unpatched OpenVPN
Test the current setup. With unpatched OpenVPN it works, but the client connects only to the first declared OpenVPN server (192.168.25.2):
[root@R1]# grep openvpn /var/log/messages
Jun 11 14:38:41 R1 openvpn[2499]: OpenVPN 2.3.11 amd64-portbld-freebsd10.3 [SSL (OpenSSL)] [LZO] [MH] [IPv6] built on May 31 2016
Jun 11 14:38:41 R1 openvpn[2499]: library versions: OpenSSL 1.0.1s-freebsd  1 Mar 2016, LZO 2.09
Jun 11 14:38:41 R1 openvpn[2500]: UDPv4 link local (bound): [undef]
Jun 11 14:38:41 R1 openvpn[2500]: UDPv4 link remote: [AF_INET]192.168.25.2:1194
Jun 11 14:38:42 R1 openvpn[2500]: [R2] Peer Connection Initiated with [AF_INET]192.168.25.2:1194
Jun 11 14:38:45 R1 openvpn[2500]: TUN/TAP device /dev/tun0 opened
Jun 11 14:38:45 R1 openvpn[2500]: do_ifconfig, tt->ipv6=1, tt->did_ifconfig_ipv6_setup=1
Jun 11 14:38:45 R1 openvpn[2500]: /sbin/ifconfig tun0 10.0.21.6 10.0.21.5 mtu 1500 netmask 255.255.255.255 up
Jun 11 14:38:45 R1 openvpn[2500]: /sbin/ifconfig tun0 inet6 2001:db8:21::1000/64
Jun 11 14:38:45 R1 openvpn[2500]: add_route_ipv6(2001:db8:2::/64 -> 2001:db8:21::1 metric -1) dev tun0
Jun 11 14:38:45 R1 openvpn[2500]: Initialization Sequence Completed
[root@R1]# ping -c 4 10.0.2.2
PING 10.0.2.2 (10.0.2.2): 56 data bytes
64 bytes from 10.0.2.2: icmp_seq=0 ttl=64 time=199.854 ms
64 bytes from 10.0.2.2: icmp_seq=1 ttl=64 time=199.922 ms
64 bytes from 10.0.2.2: icmp_seq=2 ttl=64 time=199.921 ms
64 bytes from 10.0.2.2: icmp_seq=3 ttl=64 time=199.925 ms

--- 10.0.2.2 ping statistics ---
4 packets transmitted, 4 packets received, 0.0% packet loss
round-trip min/avg/max/stddev = 199.854/199.906/199.925/0.030 ms
Compatibility matrix
Methodology
For this test:
- Upgrade OpenVPN on R2 (the first server) and verify that the unpatched R1 client can still connect to the patched R2 server.
- Upgrade OpenVPN on R1 and verify that it can connect to the patched R2 server.
- Modify R1's OpenVPN configuration to put R3 (the second, unpatched OpenVPN server) first in the server list, and verify that R1 (patched client) can connect to R3 (unpatched server).
- Finally, revert R1's configuration so that R2 is first, R3 second, and R4 third.
Results
| server unpatched | server patched | |
|---|---|---|
| client unpatched | OK | OK |
| client patched | OK | OK |
Testing the new remote-best-latency option
OpenVPN is still not upgraded on the last two servers (R3 and R4), but the remote-best-latency option is added on the client:
service openvpn stop
echo "remote-best-latency" >> /usr/local/etc/openvpn/openvpn.conf
openvpn.conf should look like this:
client
dev tun
#Declare servers with bigger latency first
remote 192.168.25.2
remote 192.168.35.3
remote 192.168.45.4
remote-cert-tls server
ca ca.crt
cert R1.crt
key R1.key
remote-best-latency
Then start openvpn to check the new behavior:
[root@R1]/usr/local/etc/openvpn# openvpn openvpn.conf
Fri Jun 17 07:04:44 2016 OpenVPN 2.3.11 amd64-portbld-freebsd10.3 [SSL (OpenSSL)] [LZO] [MH] [IPv6] built on Jun 16 2016
Fri Jun 17 07:04:44 2016 library versions: OpenSSL 1.0.1s-freebsd  1 Mar 2016, LZO 2.09
Timeout reached
Timeout reached
Timeout reached
Timeout reached
Timeout reached
Timeout reached
Timeout reached
Timeout reached
Timeout reached
Timeout reached
Timeout reached
Fri Jun 17 07:04:54 2016 UDPv4 link local (bound): [undef]
Fri Jun 17 07:04:54 2016 UDPv4 link remote: [AF_INET]192.168.45.4:1194
Fri Jun 17 07:04:54 2016 [R4] Peer Connection Initiated with [AF_INET]192.168.45.4:1194
Fri Jun 17 07:04:56 2016 TUN/TAP device /dev/tun0 opened
Fri Jun 17 07:04:56 2016 do_ifconfig, tt->ipv6=1, tt->did_ifconfig_ipv6_setup=1
Fri Jun 17 07:04:56 2016 /sbin/ifconfig tun0 10.0.41.6 10.0.41.5 mtu 1500 netmask 255.255.255.255 up
Fri Jun 17 07:04:56 2016 /sbin/ifconfig tun0 inet6 2001:db8:41::1000/64
add net 10.0.2.0: gateway 10.0.41.5 fib 0
add net 10.0.41.1: gateway 10.0.41.5 fib 0
Fri Jun 17 07:04:56 2016 add_route_ipv6(2001:db8:2::/64 -> 2001:db8:41::1 metric -1) dev tun0
add net 2001:db8:2::/64: gateway tun0 fib 0
Fri Jun 17 07:04:56 2016 Initialization Sequence Completed
Note the timeout messages: two OpenVPN servers are still not upgraded and do not support the OpenVPN latency-ping packets, so those probes time out. The client no longer connects to the first declared server but to R4 here (why?).
Bug on the latest version:
[root@R1]/usr/local/etc/openvpn# openvpn openvpn.conf
Tue Oct  6 00:57:23 2020 OpenVPN 2.4.9 amd64-portbld-freebsd13.0 [SSL (OpenSSL)] [LZO] [LZ4] [MH/RECVDA] [AEAD] built on Oct  5 2020
Tue Oct  6 00:57:23 2020 library versions: OpenSSL 1.1.1h-freebsd  22 Sep 2020, LZO 2.10
SHM 3
Invalid port number: -4600
Service was not recognized for socket type: No error: 0
Invalid port number: -4587
Service was not recognized for socket type: No error: 0
Invalid port number: 2793528
Service was not recognized for socket type: No error: 0
Invalid port number: 0
Invalid port number: 519602944
Service was not recognized for socket type: No error: 0
Invalid port number: 1701407843
Service was not recognized for socket type: No error: 0
Oct  6 00:57:23 router openvpn[78665]: stack overflow detected; terminated
Invalid port number: 0
Invalid port number: 1095649103
Service was not recognized for socket type: No error: 0
Oct  6 00:57:23 router openvpn[82522]: stack overflow detected; terminated
Invalid port number: 538968179
Service was not recognized for socket type: No error: 0
Invalid port number: 538968179
Service was not recognized for socket type: No error: 0
Invalid port number: 14983496
Service was not recognized for socket type: No error: 0
Invalid port number: 14790984
Service was not recognized for socket type: No error: 0
Invalid port number: 14790848